SpringBoot-集成Swagger2文档生成
随着前后端分离和微服务架构的流行,甚至有些公司强制使用微服务架构,在提高效率同时,问题也随之而来。通常我们的一个RESTful API,会对应不同的开发者,Android,IOS,Web,小程序等不同团队研发人员,显然沟通成本成倍的增长,一般我们都会通过共享文档来维护这些 API ,但随着项目中 API 越来越多,版本升级越多,就会造成文档维护不及时或者无人维护的问题。如果你所在团队也正在面临这样的问题,那么今天我们一起来学习文档神器 Swagger。
介绍
Swagger 是一款 RESTful 接口的文档在线自动生成外加调试功能的软件。可以将项目的所有接口在一个UI界面上展示出来,同时表明了这个接口的用途,接口需要的参数是什么类型参数是否必须,输入了参数可以直接测试接口类似postman的功能,会显示接口请求的状态码和返回的数据结构。
那么后端开发人员只需要在代码中添加几个注解,就会生成一套标准的文档,而且随着代码的变动也随之更新,这样减少了单独维护文档成本,也减少了团队之间的沟通成本,接下来我们来看怎么将 Swagger 集成到 Spring boot 中。
加依赖
需要加入 swagger2 和 swagger-ui 的包1
2
3
4
5
6
7
8
9
10<dependency>
<groupId>io.springfox</groupId>
<artifactId>springfox-swagger2</artifactId>
<version>2.9.2</version>
</dependency>
<dependency>
<groupId>io.springfox</groupId>
<artifactId>springfox-swagger-ui</artifactId>
<version>2.9.2</version>
</dependency>
写配置
1 | swagger: |
注意:在生产环境将此配置设置为 false
因为使用原生的 swagger,需要额外加入swagger 的配置类1
2
3
4
5
6
7
8
9
10
11
12
13
14
15
16
17
18
19
20
21
22
23@Configuration
@EnableSwagger2
@ConditionalOnProperty(name = "swagger.enable", havingValue = "true")
public class SwaggerConfig {
@Bean
public Docket createRestApi() {
return new Docket(DocumentationType.SWAGGER_2)
.apiInfo(apiInfo())
.select()
.apis(RequestHandlerSelectors.basePackage("com.shure.swagger2"))
.paths(PathSelectors.any())
.build();
}
//配置在线文档的基本信息
private ApiInfo apiInfo() {
return new ApiInfoBuilder()
.title("springboot利用swagger构建api文档")
.description("用户管理接口文档")
.termsOfServiceUrl("https://dddreams.github.io/")
.version("0.1")
.build();
}
}
加注解
在启动类加 @EnableSwagger2注解,或者在上面 SwaggerConfig 类上加入此注解。1
2
3
4
5
6
7@SpringBootApplication
@EnableSwagger2
public class SpringBootSwagger2Application {
public static void main(String[] args) {
SpringApplication.run(SpringBootSwagger2Application.class, args);
}
}
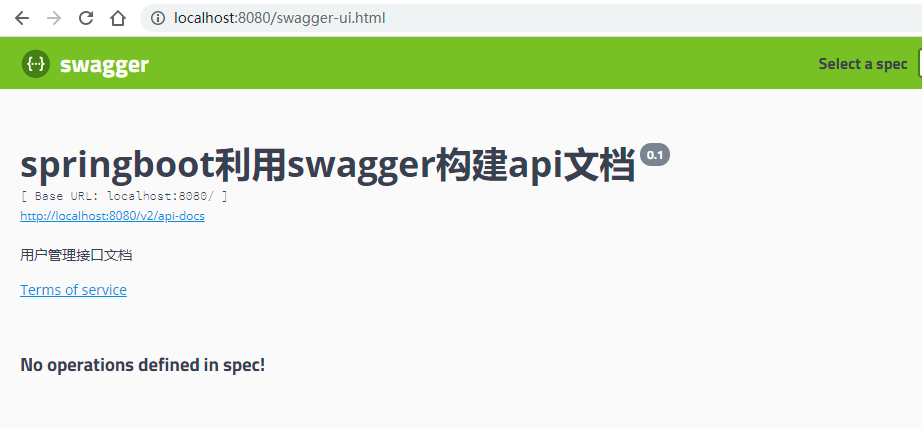
如何使用
OK,完成上面三步,已经可以使用 swagger 了,启动后访问,http://localhost:8080/swagger-ui.html
编写业务接口
新建用户的实体类 UserEntity,为了简化代码我们会引入 lombok 的插件。1
2
3
4
5
6
7
8
9
10
11
12
13
14@Data
@ApiModel(description="用户实体")
public class UserEntity {
@ApiModelProperty("用户编号")
private Integer id;
@ApiModelProperty("用户姓名")
private String name;
@ApiModelProperty("用户年龄")
private int age;
@ApiModelProperty("用户性别")
private boolean gender;
@ApiModelProperty("住址")
private String address;
}
新建用户相关的 API 接口1
2
3
4
5
6
7
8
9
10
11
12
13
14
15
16
17
18
19
20
21
22
23
24
25
26
27
28
29
30
31
public class UserController {
// 模拟users信息的存储
static Map<Integer, UserEntity> users = Collections.synchronizedMap(new HashMap<>());
public List<UserEntity> list(){
List<UserEntity> us = new ArrayList<>(users.values());
return us;
}
public UserEntity getUser( Integer id) {
return users.get(id);
}
public String postUser( UserEntity user) {
users.put(user.getId(), user);
return "success";
}
public String deleteUser( Integer id) {
users.remove(id);
return "success";
}
}
查看接口文档
再来看看 swagger 的页面会发生什么变化。
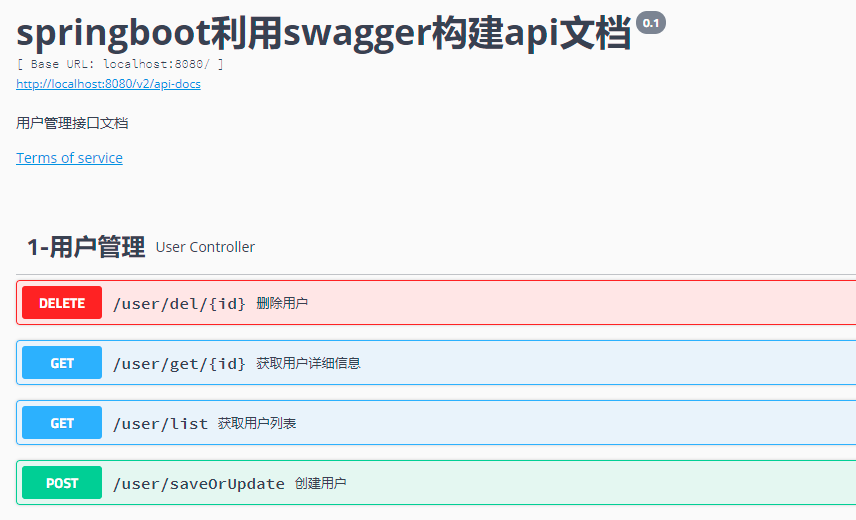
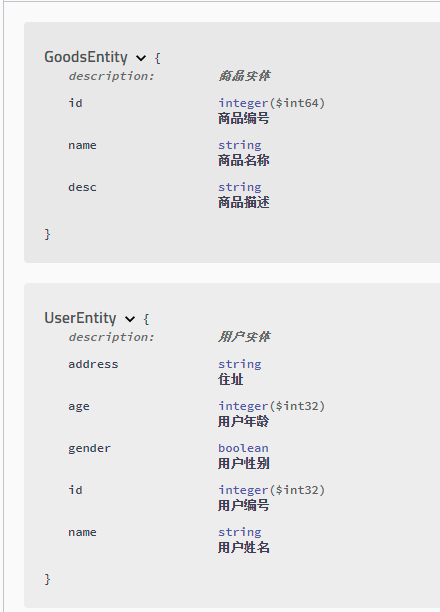
展开标签后,会看到每个接口的详细信息,并且可以在线调试,返回结果的数据结构也一目了然。还包括实体的信息也会在文档中展现。
接口及方法的分类排序
随着业务的增长,API 接口数量的增长,实际使用中我们会发现找一个接口会非常困难,这就考虑为接口和方法进行分类排序,方便查找。
接口的分类
对于接口的分类,swagger 提供了 tags 的参数,只需在 Controller 的 @Api 注解上加参数 tags 即可。1
2
3
4
5
6
7
8
9
10
11
12
13@Api(tags = "用户管理")
@RestController
@RequestMapping("/user")
public class UserController {
...
}
@Api(tags = {"商品管理", "..."})
@RestController
@RequestMapping("/goods")
public class GoodsController {
...
}
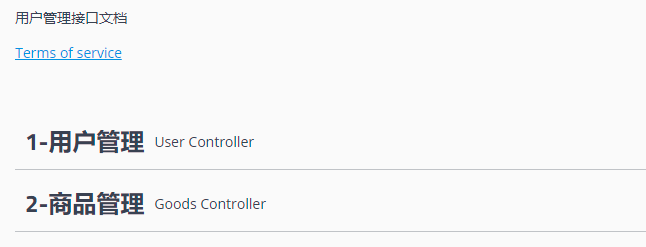
可以将同类的接口,指定在 tags 中,文档中就会出现一个分类中。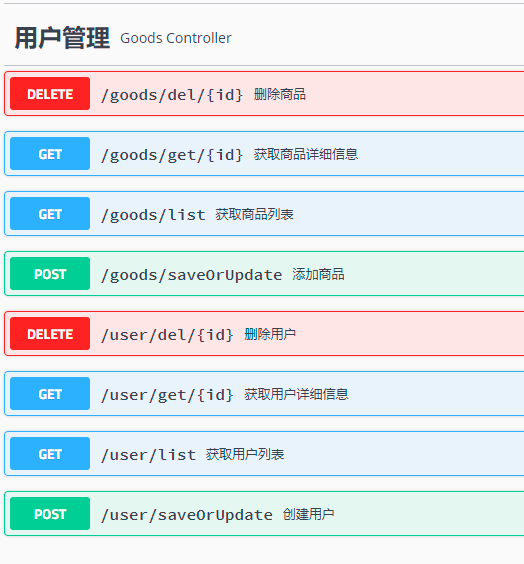
接口的排序
对于接口的排序,swagger 默认是根据字母顺序排的,并且只提供了这一种排序方式,我们可以投机取巧在 tags 参数的前面添加数字让其按顺序排列。1
2
3
4
5
6
7
8
9
10
11
12
13@Api(tags = "1-用户管理")
@RestController
@RequestMapping("/user")
public class UserController {
...
}
@Api(tags = {"2-商品管理"})
@RestController
@RequestMapping("/goods")
public class GoodsController {
...
}
方法的排序
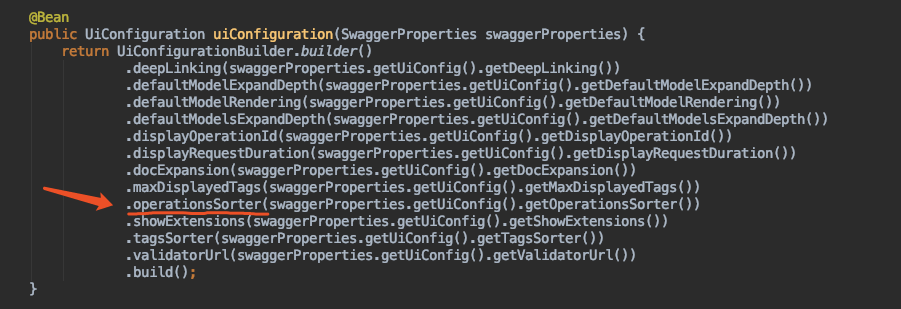
方式一,swagger 默认是根据字母顺序排的,可以通过以下方式:
图片来源于 程序猿DD 的博客:https://blog.didispace.com/spring-boot-learning-21-2-4/
方式二,引入 spring4all 社区开源的 swagger-spring-boot-starter
github地址:https://github.com/SpringForAll/spring-boot-starter-swagger1
2
3
4
5<dependency>
<groupId>com.spring4all</groupId>
<artifactId>swagger-spring-boot-starter</artifactId>
<version>1.9.1.RELEASE</version>
</dependency>
添加配置:1
swagger.ui-config.operations-sorter=alpha
方法的排序 swagger 提供了两个配置,alpha和method,默认为alpha。
方式三,引入 knife4j 开源的,knife4j-spring-ui基于bootstrap的ui框架。
github地址:https://github.com/xiaoymin/swagger-bootstrap-ui
gitee地址:https://gitee.com/xiaoym/knife4j/tree/master/swagger-bootstrap-ui1
2
3
4
5<dependency>
<groupId>com.github.xiaoymin</groupId>
<artifactId>swagger-bootstrap-ui</artifactId>
<version>${lastVersion}</version>
</dependency>
使用该方式需要在 SwaggerConfig 配置类上添加 @EnableSwaggerBootstrapUI注解,然后在方法上添加@ApiOperationSupport(order = 1)注解,并指定 order 的值。1
2
3
4
5
6
7
8
9
10
11
12
13
14
public List<UserEntity> list(){
List<UserEntity> us = new ArrayList<>(users.values());
return us;
}
public UserEntity getUser( Integer id) {
return users.get(id);
}
启动程序,访问:http://localhost:8080/doc.html,界面长这个样子。
注意:需要在个性化设置中开启 启用SwaggerBootstrapUi提供的增强功能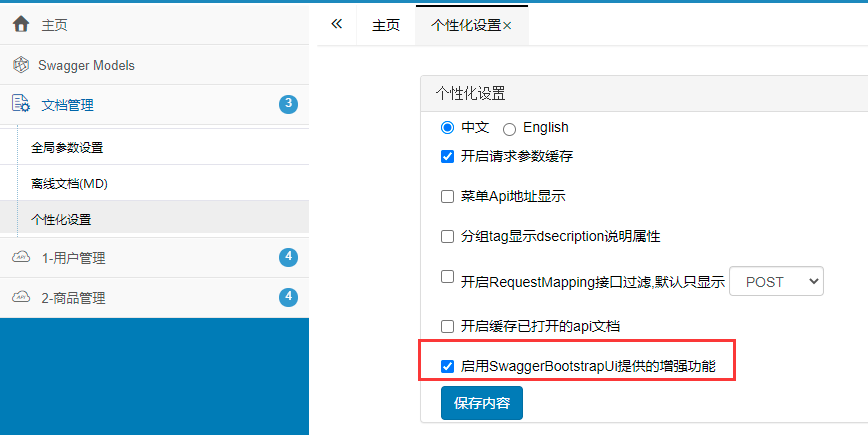
这样你就会发现,方法的排序按照我们设置的 order 排序了。
参数的排序
参数的排序比较简单,只需在实体字段的注解上加 position 属性,参数就可以根据设置的position值进行排序了。1
2
3
4
5
6
7
8
9
10@Data
@ApiModel(description="商品实体")
public class GoodsEntity {
@ApiModelProperty(value = "商品编号", position = 1)
private Long id;
@ApiModelProperty(value = "商品名称", position = 2)
private String name;
@ApiModelProperty(value = "商品描述", position = 3)
private String desc;
}
参考和相关链接
示例代码:https://github.com/dddreams/learn-spring-boot/tree/master/spring-boot-swagger2
Swagger官网:https://swagger.io/
Swagger接口分类与各元素排序问题详解:https://blog.didispace.com/spring-boot-learning-21-2-4/

更多文章请关注微信公众号: zhiheng博客
如果文章对你有用,转发分享、赞赏才是真爱 [斜眼笑]
